

Due to Feline Interference, we can no longer have a Christmas Tree but that doesn’t stop us from making EPIC decorations for the holidays!
Visit our winter wonderland and follow our easy DIY steps to “bake” your own cardboard gingerbread house this season!
HERE ARE THE SUPPLIES WE USED:
*Be sure to have adult supervision for dangerous items like glue guns & sharp objects!!!
HEAVY DUTY Boxes – these are important as they are more sturdy & hold up to kitty craziness longer!
Regular boxes for additional non-structural pieces
*Glue Gun & Glue Sticks
Hairdryer – GREAT for quickly cooling glue for strong hold & timesaver!
Masking Tape
*Box Cutter / Exacto Knife / Scissors
Cutting Board
Ruler
Paper Towel Rolls
Small Paper Plates – cheap, thinnest brand is easiest to cut
White Paper – we used basic printer paper
Brown Scrapbook/Construction Paper – use this for boxes you have that can’t be “turned inside out”
Decorative Paper / Scrapbook Paper with holiday designs
Paper punches (if desired)
Mod Podge – optional for decorations if needed
Wrapping Paper – your choice of pattern; we found the PURRfect candy cane design! =)


Gingerbread House ASSEMBLY STEPS & TIPS:
-Sketch out & test your basic design with the available boxes. You can use as few or as many as you want!
-We reassembled our boxes “inside out” so that any writing was on the inside; leaving the plain “gingerbread” cardboard brown on the outside =)
-Stack your boxes in your desired design – DO NOT GLUE / TAPE yet!
-Mark locations of doors and windows, making sure your cat will have room to enter the structure. Cole and Marm loved to be able to secretely watch you from inside so the windows help them feel safe but still involved =)
-We chose to add a porch to our structure and used the paper towel tubes for “pillars”. These were wrapped with the candy cane wrapping paper during the prep stages for that extra gingerbread house feel. YUM!
-CAREFULLY cut out your doors/windows by slipping the cutting board between the box sides.
**TIP** Once you cut your first door/window, you can use the piece as a template to trace the others for a uniform look.
You can now glue your gingerbread structure together!
**TIP**BE SURE you can easily move this from room to room if building a large gingerbread house. Ours is so large, that we had to use tape on the back (not glue) to secure both the right & left main sides together. This way we can easily remove the tape without damaging the house to move after the holidays. Hopefully it fits through the door! LOL
For our “attic” space, we decided more color was needed and lined the inside with the same candy cane wrapping paper to tie the design together before glueing.
NOW IT’S TIME TO DECORATE!!!
BE CAREFUL to glue your decorations to the individual sides if having to separate during deconstruction!
Remember to use CAT SAFE DECORATIONS so your furbabies can enjoy without worry =)
-Cut the paper plates in 1/2 and then cut the center circle out to form a “U” shape. Glue these to the roof areas like “snowcaps”.
-Take the white paper and twist/scrunch up into long strips and/or small balls. This will be the “frosting” you will glue to ALL the edges and creases of your gingerbread house so you may need quite a bit, but the finished product looks great with as much or as little as you want!
-Our decorative scrapbook paper had candy shapes we cut out (used punch for circles).
-Probably our favorite “candy” idea was to use plastic eggs halves as “gumdrops” and glued these to the roofs and porch to add safe color in the easiest way possible!
-Another scrapbook paper we found had a beautiful wreath we carefully cut out and used Mod Podge to glue to the house.
-Guarantee the CATS favorite part of the finished house was the Fringed Tissue Paper we ordered online in white to represent the “snow”. If you don’t have space to lay this around the house permanently, it makes a great liner for inside as comfy bedding =)
Give the house a good “once-over” to remove all glue gun “spiderwebs” as we call them so the cats don’t walk into them and/or eat any.
And that’s it!!!! Sprinkle some nip, treats and maybe blow some catnip “snow bubbles” to get the fun started. The holiday decorations are safe, trees around the world thank you and your cats will have a blast enjoying their new Epic Gingerbread House!!!
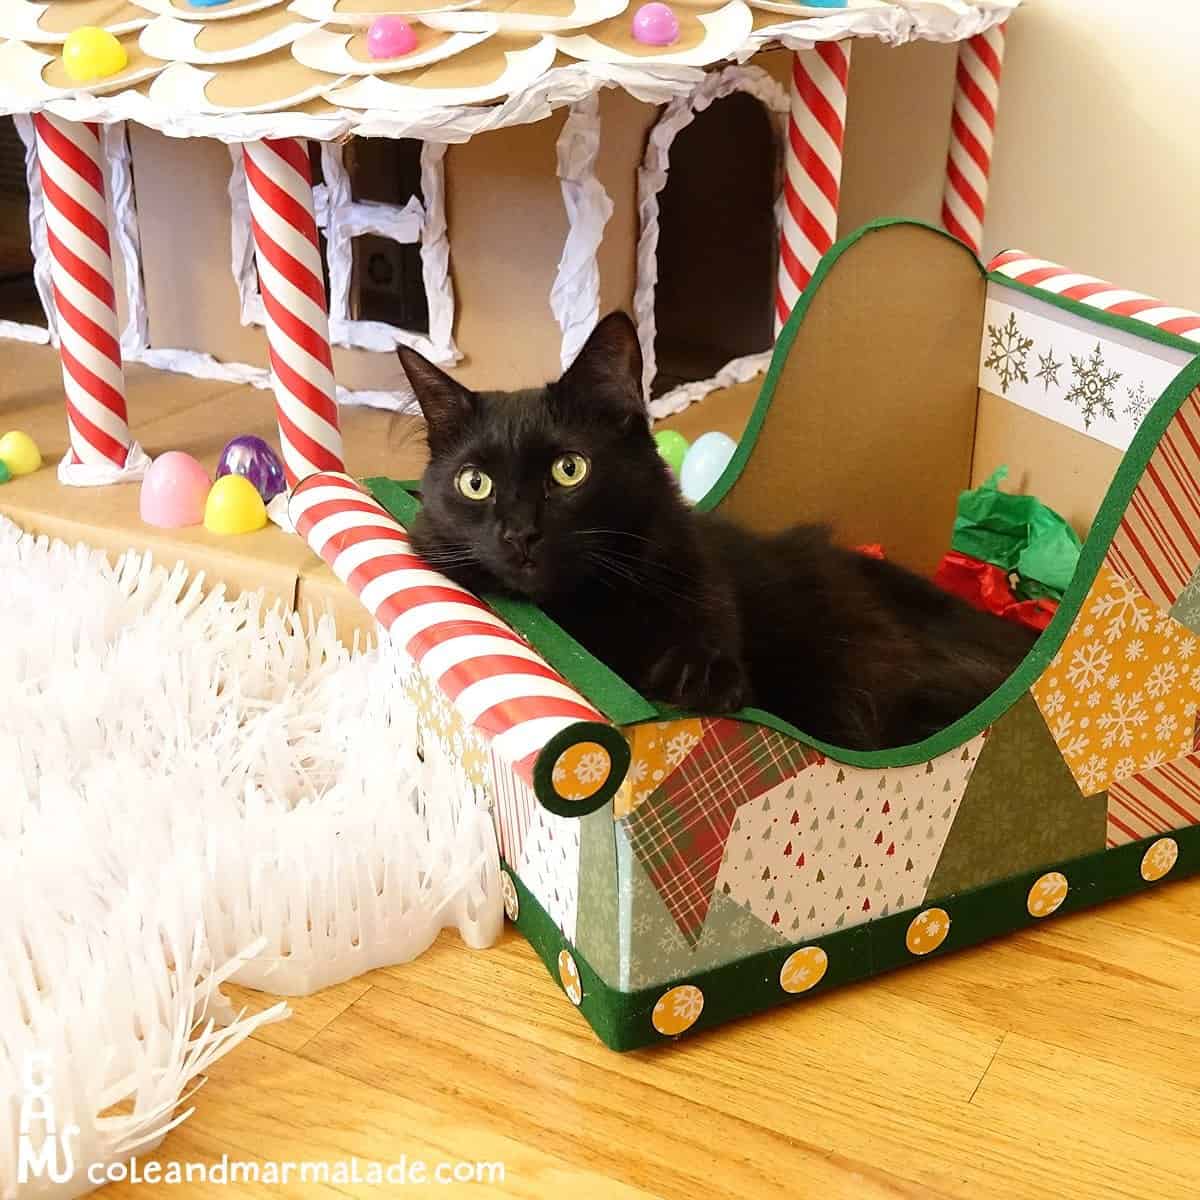
PURRhaps next year we’ll film the sleigh with instructions if we can get Jess to make another – Cole currently sleeps in it every day so bonus <3
MEOWY CATMAS from the CaM Fam!

Oh I have two left hands (MOL), and also too little room in my appartment with only 1 1/2 rooms, Gizzy and Thori´re happy with that because they´re seniors yet, and Angel Sisi´s also been, but no room for any new cat FURniture or so here, happy #WhiskersWednesday!!! ?????? (This is my comment from Twitter where I saw your post, I´m @marillion13 there, but also follow you on FB and Instagram)
My senior kitties Gizzy & Thori (with Angel Sisi furever in our hearts) made the following post and shared it:
https://www.facebook.com/permalink.php?story_fbid=1376559322449064&id=576379702467034